Kanban board setup: a step-by-step guide
Most Kanban boards do not fail because the team stopped caring. They fail because three decisions were never made: what each column means, when a card is allowed to move, and who owns it. Skip those and you get a wall of cards nobody trusts. Make them on day one and the board answers “where are we?” before anyone has to ask.
This guide walks through Kanban board setup in the order the decisions actually come up. Building the board takes minutes. Making it stick takes a handful of agreements, and those are here too.
This is the step-by-step half of the complete guide to Kanban for teams - start there for WIP limits, ownership rules, and how to replace the status meeting entirely.
Before you start: three questions
Answer these before you open any tool. They take two minutes and they decide almost everything that follows.
- What stream of work is this board for? One project, one queue, one product. Not “the company”.
- What stages does work really pass through today? Describe what happens now, not the process you wish you had.
- Who will use it? Names, not departments. You can only assign work to people who are on the board.
Step 1: Create one board per stream of work
A board should cover the work that the same people discuss in the same meeting. Website Launch. Support Escalations. Sprint 14. Hiring Pipeline. One giant board for everything looks organised for a week, then hides which project is in trouble.
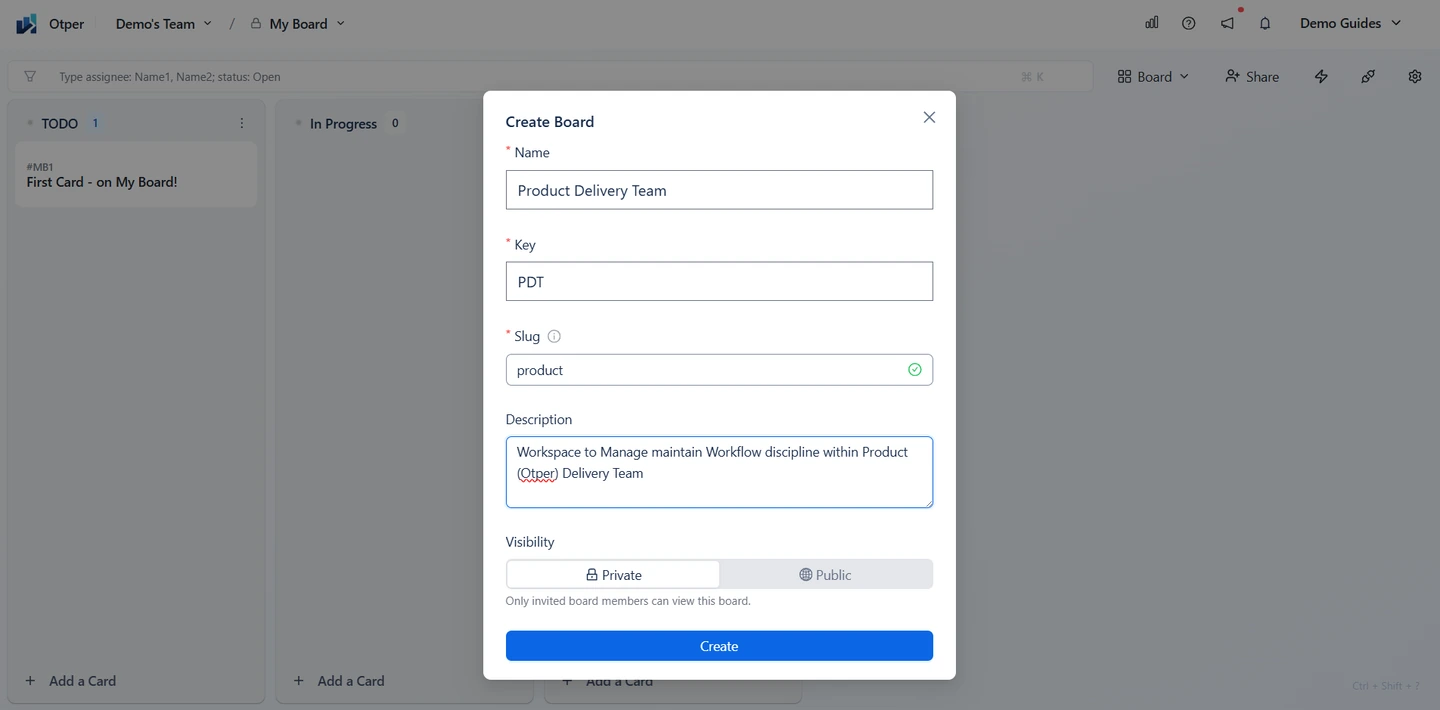
When you create a board in Otper, three fields are worth a moment’s thought:
- Name - what the team calls this work out loud.
- Key - a short prefix on every card ID, like
WEB-12. Keep it to two or three letters so people can say it in a standup. - Slug - the board’s URL. A clear slug makes shared links readable.
You also choose whether the board is private. A new Otper board arrives with four lists already in place - Inbox, TODO, In Progress and Done - so you start by editing a working board instead of staring at an empty screen. Getting this far takes minutes, and the Free plan covers up to three teammates with unlimited projects and no credit card, so you can build the real thing before committing to anything.
Step 2: Structure your columns as stages
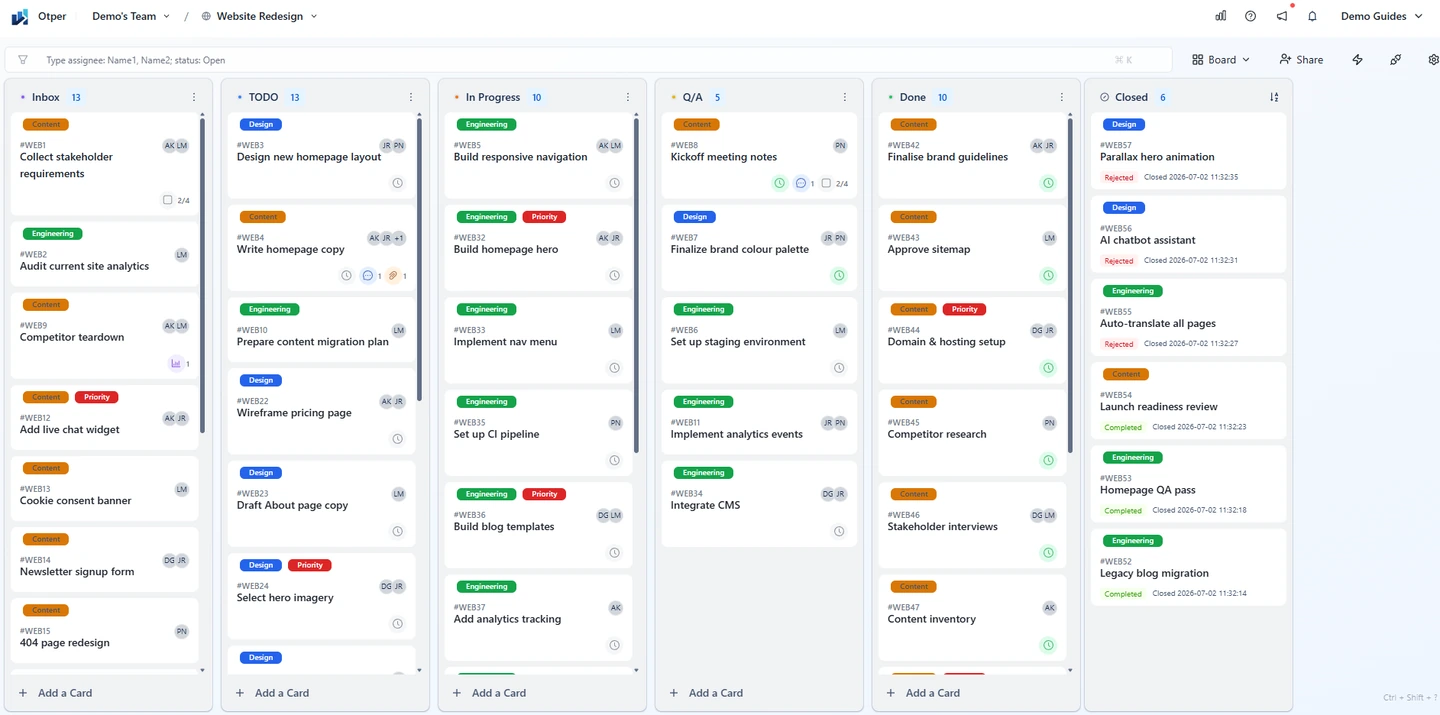
Here is the rule that prevents most bad boards: a column is a stage work passes through, not a category work belongs to.
Columns named Design, Development and Marketing are categories. Cards never leave them, so the board stops moving and starts filing. Categories belong on labels. Columns are for stages, and stages have a direction: left to right, from “asked for” to “delivered”.
How many columns?
Four to six. Fewer than four usually hides a handoff the team really makes, so work looks finished when it is actually waiting on someone. More than six and every card move becomes admin.
Add a column only when work genuinely waits at that point. If a card passes through a stage in ten minutes, it is a step in a checklist, not a column.
Three structures that work
| Team | Columns, left to right |
|---|---|
| Software | Backlog → In Development → Code Review → QA → Released |
| Agency | Inbox → Briefed → In Progress → Client Review → Approved |
| Marketing | Requests → This Sprint → In Progress → Review → Published |
Two columns worth considering
- An intake column. Somewhere new requests land before anyone commits to them. It keeps “someone asked” separate from “we agreed to do it”. Otper names the first list Inbox for exactly this reason.
- A waiting column - Blocked, or Waiting on Client. Add it only if work really does stall on someone outside the team. When it exists, blocked work stops hiding inside In Progress and pretending to be active.
Rename the four default lists to your stages, drag them into order, and add or remove one if you need to. Columns can be renamed and reordered later as the workflow settles, and cards keep their activity history when you do - so getting the first version roughly right is enough.
Step 3: Define what each stage means
A column called In Review means nothing until the team agrees what has to be true for a card to arrive there, and what has to be true before it leaves. Two short rules per column are enough:
- Entry rule - what must be true for a card to enter this column.
- Exit rule - what must be finished before it moves on.
| Column | Enters when | Leaves when |
|---|---|---|
| Inbox | Anyone asks for something | It has an owner and a clear title |
| To Do | The team has committed to it | Someone actually starts it |
| In Progress | Work has started today | It is ready for another pair of eyes |
| Review | A reviewer is named | The reviewer approves it |
| Done | It is live, shipped or delivered | Never - Done is the end |
Write the rules where the team will actually see them. Each list in Otper has its own description, so the stage rule can live on the column itself instead of in a document nobody opens. It is a small thing that settles a surprising number of arguments.
Pay particular attention to the last column. A “Done” that means delivered to one person and I finished my bit to another is the fastest way to lose trust in a board. Pick one meaning and write it down.
Step 4: Cap the work in progress
A board with no limits fills up. Everything is started, nothing finishes, and In Progress turns into a list of things people feel guilty about. A work-in-progress limit fixes this by capping how many cards a column can hold at once.
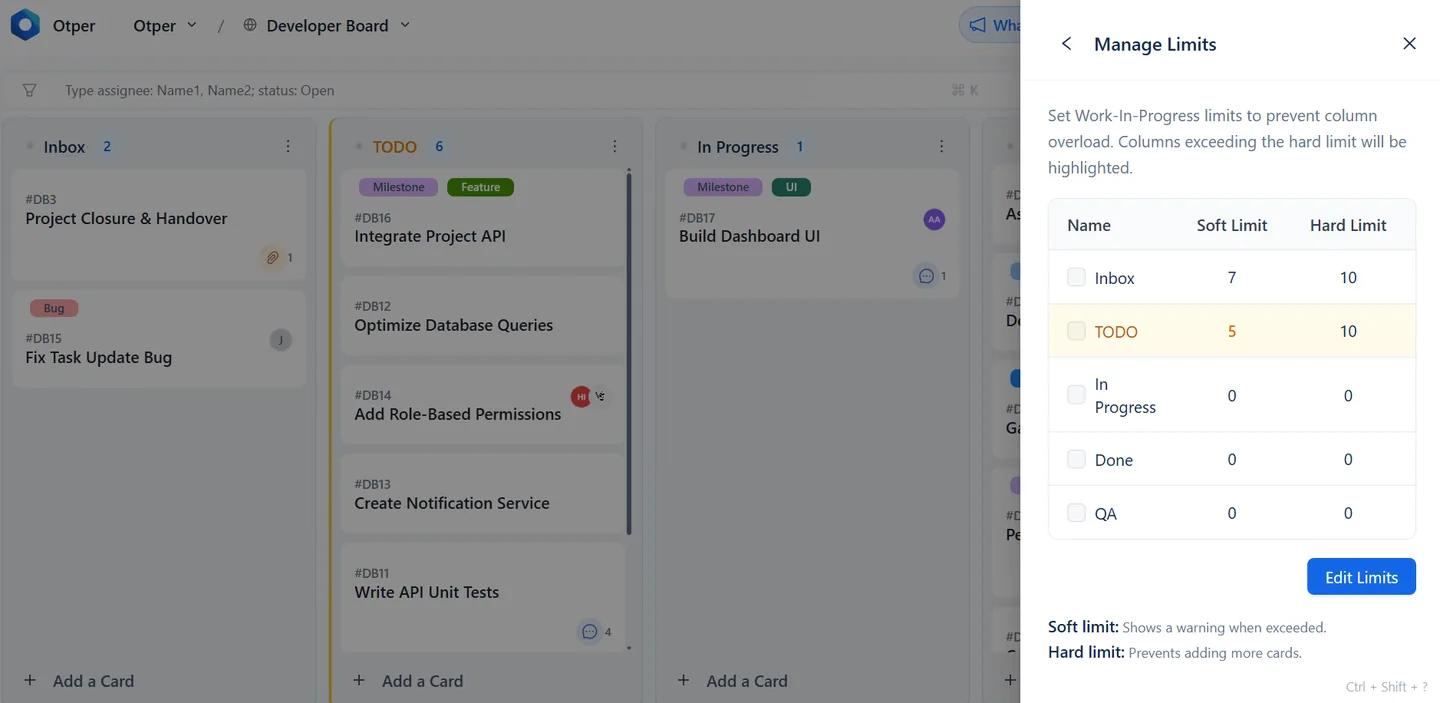
In Otper, open Board Settings → Manage Limits and set two numbers per column:
- Soft limit - a warning. Pass it and the column is highlighted in amber, and you are told it is full when you add another card. Nothing is stopped. It is a nudge to finish something.
- Hard limit - a stop. At the hard limit the column turns red and Otper will not move a card into it from another column until something leaves. Reordering cards inside the same column always works, so you can still prioritise what is already there.
A reasonable starting point: set the soft limit on your busiest stage to the number of people who work in it, and the hard limit a little above that. Both default to zero, which means off, so you can switch them on for one column, watch what happens for a week, and go from there. The soft limit has to be less than or equal to the hard limit.
Start with In Progress. That is where limits do the most good, because it is the column where “I’ll just start this too” quietly turns into six unfinished things.
Step 5: Assign card ownership from day one
Columns tell you where work is. Owners tell you who is going to move it. A board with clear stages and unassigned cards still leaves everyone waiting for someone else.
Invite the team first
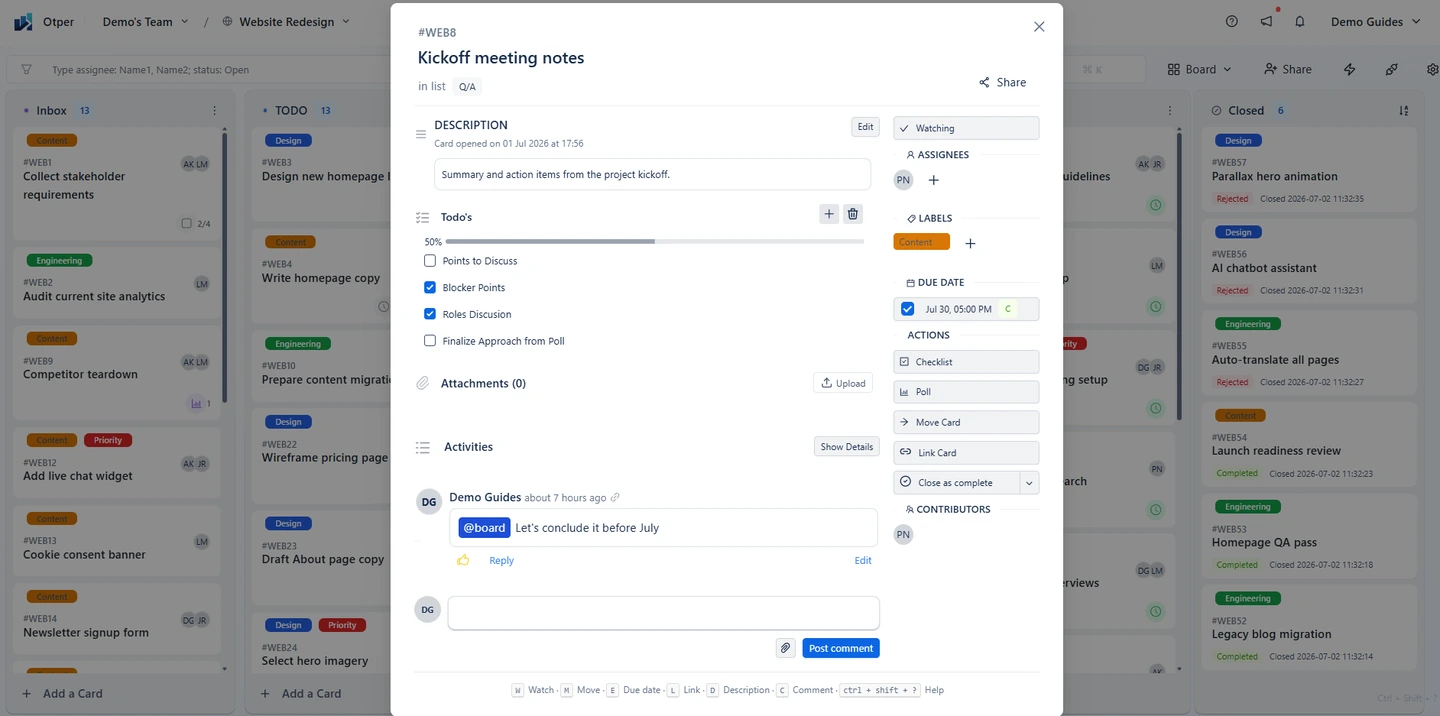
You can assign a card only to someone who is a member of that board, so invite people before you start handing out work. Board roles are administrator and editor: administrators manage the board and its settings, editors do the work on it. Invite from board settings, or share a board invite link.
One accountable owner per active card
Otper does not force this. Cards can sit unassigned, and a card can carry several assignees when several people genuinely work on it. That flexibility is useful - but it means single ownership is a habit your team decides on, not something the tool imposes.
Adopt it anyway. Add extra assignees where the collaboration is real, and still be able to name the one person accountable for the card moving. “Everyone owns it” and “nobody owns it” look identical on a board a week later.
Decide when a card gets its owner
The simplest rule that holds: a card gets an owner when it leaves the intake column. Anything in Inbox may be unassigned. Anything past it has a name on it. That one rule keeps the backlog open to everyone while making committed work accountable.
Ownership survives the handover
People change teams, take leave, and hand work over. When someone is unassigned from a card in Otper, they are kept on it as a past contributor rather than erased, so months later you can still see who worked on something and go and ask them. Unassigning within a few minutes simply removes the mistake, which is what you want when the wrong person was tagged.
Catch the cards nobody picked up
Ownership slips quietly. Rather than auditing the board by eye, let it check itself. Otper automations can run on a schedule with a condition of unassigned - optionally limited to one column - and then post a comment or add a label on whatever they find. A daily rule that flags unassigned cards in To Do takes a minute to set up and quietly does the chasing you would otherwise do in a meeting.
Rules can also fire on events: when a card is created, when it is moved into a column, or when it is assigned. There are more examples in workflow automation for Kanban teams, and more on ownership in assigning clear ownership across remote teams.
Step 6: Add only the detail you will maintain
Every field you add is a field someone has to keep true. Start with four and add more only when you find yourself missing them:
- Due dates where there is a real commitment. A date on every card teaches the team to ignore dates.
- Labels agreed before the board fills up. Five or six, for the things you will actually filter by.
- Checklists for the steps inside a card, especially the definition of done.
- Comments and files on the card, so the decision and the work live in the same place.
Step 7: Agree the rules of the board
The setup is done. What keeps a board alive is five short agreements, ideally written into the board description where new joiners will find them:
- Who can create cards. Usually everyone.
- When a card gets an owner. Suggested: on leaving intake.
- Who moves cards. The owner moves their own - nobody moves cards for other people.
- What Done means. One sentence.
- When the board is reviewed together. A ten-minute standup or an async check-in.
The third one matters more than it looks. When owners move their own cards, the board stays honest and the move is the status update - there is no separate reporting step to forget.
Check the board after one week
Your first structure is a guess. Sit down after a week and ask four questions:
- Which column holds the most cards? That is your bottleneck, not your busiest team.
- Is any column empty? Either it is not a real stage, or people are skipping it.
- How many cards have no owner? Every one of them is a card nobody is moving.
- Does anything in Done not look finished? Your definition of Done is not shared yet.
Change one thing based on the answers, not five. A board that gets one small correction a week ends the month fitting the team. Once it has been running a while, the data it produces is worth reading on its own - which stage work gets stuck in, what is overdue, who is overloaded. That is covered in using Kanban analytics to find bottlenecks and workload issues.
Setup mistakes to avoid
- Columns as categories. Design, Dev, Marketing. Cards never leave them. Use labels instead.
- Ten columns on day one. Build for the process you have, not the one you are hoping for.
- One board for every project. Each project’s real status disappears into the pile.
- Cards with no owner. The quickest way to lose accountability without noticing.
- A private definition of Done. If two people would answer differently, it is not defined.
- No limits anywhere. Without a cap, In Progress becomes a wish list.
The setup checklist
- One board per project, queue or stream, with a short readable key
- Four to six columns, named after stages, ordered left to right
- An entry rule and an exit rule on every column, saved in its description
- One agreed meaning for Done
- A soft and hard limit on at least your busiest column
- Everyone who will be assigned work invited to the board
- One accountable owner on every card past intake
- Five board rules agreed and written down
- A ten-minute review booked for one week from now
FAQ
How many columns should a Kanban board have?
Four to six to start. Fewer than four usually hides a handoff the team really makes; more than six turns the board into a form to fill in. Add a column only when work genuinely waits there.
What columns should I start with?
To Do, In Progress, Review and Done fit most teams. A new board in Otper starts with Inbox, TODO, In Progress and Done, so you rename those to your real stages rather than building from an empty screen.
Should every card have an owner?
Otper does not require one. Cards can sit unassigned and can carry more than one assignee. Naming a single accountable owner on every active card is a team habit worth adopting, and you can assign only people who are members of that board.
What is the difference between a soft and a hard card limit?
A soft limit is a warning: the column is highlighted and you are told it is full, but nothing is stopped. A hard limit is enforced: Otper refuses to move a card in from another column until something leaves. Reordering cards inside the same column is never blocked.
Can I change columns after work has started?
Yes. Rename and reorder columns as the workflow settles. Existing cards keep their activity history, so the record of what happened is not lost.
How long does it take to set up a Kanban board?
The board itself takes minutes, because it arrives with four lists in place - renaming them and inviting your team is most of the work. Signing up for the Free plan covers up to three teammates with no credit card required. The agreements about stage rules and ownership take a first week to settle.
Keep reading
- Assigning clear ownership across remote teams
- Kanban boards in Otper - the product guide
- Working with cards
Build the board while it is fresh
Create a board in Otper, rename the four default lists to your stages, and invite your team. Free for up to three teammates, no credit card required.
Start free with Otper